






Email: sales3@zhefanjewelry.com
Custom Gold Vermeil Charm Bracelet Design: Charm Size, Spacing & Placement
Gold vermeil charm bracelet design demands precise charm size, spacing, and placement to achieve balance and style. Zhefan Jewelry breaks down how to customize each element for a polished, wearable piece that stands out.
- Quick Answer
- Key Takeaways
- What Does a Charm Bracelet Design Specification Need to Define?
- How Should Charm Size Be Specified?
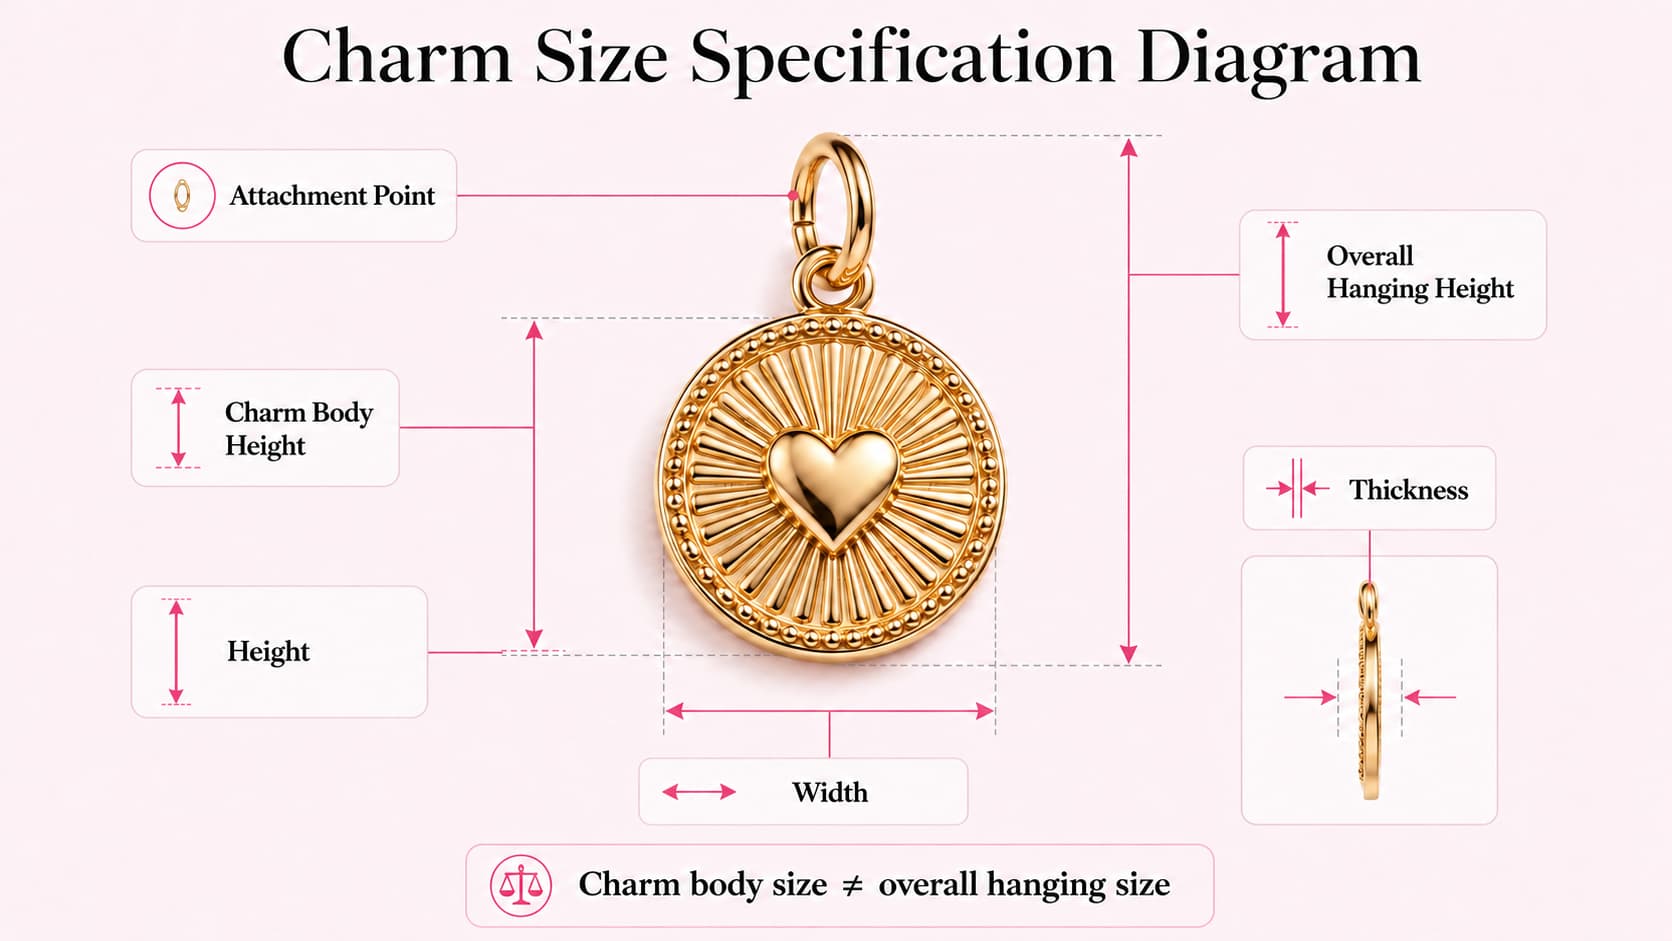
- Charm Body Size
- Charm Body Size vs Overall Hanging Size
- Attachment Point and Orientation
- How Should Brands Decide Charm Count and Layout Density?
- Sparse Layout
- Regular or Distributed Layout
- Dense Layout
- How Should Charm Spacing Be Measured?
- Center-to-Center Spacing
- Edge-to-Edge Spacing
- Designated Chain Position or Station
- Do Not Mix Spacing Methods Without Explanation
- How Should Charm Placement Be Mapped?
- Center Charm vs Repeated Charm Placement
- Center Charm
- Repeated Charms
- Alternating Charm Layout
- Symmetrical vs Asymmetrical Charm Layouts
- Symmetrical Layouts
- Asymmetrical Layouts
- Graduated Layouts
- How Do Charm Size and Spacing Work Together?
- How Should Charm Placement Account for the Clasp and Extender?
- How to Create a Charm Placement Map
- Charm Placement Map Template
- Component IDs
- Common Charm Bracelet Design Mistakes
- Using “Evenly Spaced” Without a Measurement Method
- Measuring Only the Charm Body
- Leaving the Center Reference Undefined
- Mixing Center-to-Center and Edge-to-Edge Spacing
- Ignoring Charm Orientation
- Using Product Photos Instead of a Placement Map
- Defining Charm Size Without Considering Neighboring Components
- Changing the Layout Without Updating the Documentation
- Gold Vermeil Charm Bracelet Design Specification Template
- Final Gold Vermeil Charm Bracelet Design Checklist
- Frequently Asked Questions
- Define Your Custom Gold Vermeil Charm Bracelet Layout
Quick Answer
A gold vermeil charm bracelet design should document charm size, spacing and placement as separate product specifications.
For each important charm, define the body dimensions, overall hanging dimensions where relevant, attachment point and orientation. Then choose a clear spacing method—such as center-to-center, edge-to-edge or a designated chain position—and map every important charm from a declared reference point.
A product photo or a note such as “evenly spaced” may communicate the general visual intention, but it should not replace measurable layout instructions when exact charm positioning matters to the finished bracelet.
This guide focuses specifically on bracelet-level charm layout and placement specifications rather than charm material sourcing, manufacturing costs or supplier selection.
Key Takeaways
- Charm body size and total hanging size are not always the same measurement.
- Define whether the stated charm dimensions include attachment loops, connectors or jump rings.
- Use one documented spacing method consistently across the bracelet layout.
- Identify charm positions from a clear reference point or designated chain location.
- Symmetrical and asymmetrical designs should both use measurable placement rules.
- Charm dimensions and spacing should be considered together to reduce unintended crowding or overlap.
- Use a charm placement map when several charms, repeated motifs or different charm sizes are used.
What Does a Charm Bracelet Design Specification Need to Define?
A charm bracelet is more than a chain with decorative elements attached to it.
For custom product development, the bracelet layout needs to answer several different questions:
- How large is each charm?
- How far does each charm hang?
- Where is each charm positioned?
- How is spacing measured?
- Which direction should each charm face?
- Which charm is the visual center?
- Does the design repeat or alternate different motifs?
These questions should not be grouped into one vague instruction such as:
Add five charms evenly across the bracelet.
That may communicate the general concept, but it does not fully define the layout.
| Design Field | What It Defines |
|---|---|
| Charm size | Physical dimensions of the charm body |
| Overall hanging size | Total hanging dimension including relevant attachment structure |
| Spacing | Distance or position relationship between charms |
| Placement | Exact location and orientation of each charm |
Size tells you what the charm is; spacing and placement tell you where it belongs.
These fields can then be incorporated into the broader gold vermeil bracelet specifications for the complete product.
How Should Charm Size Be Specified?
Charm size should be defined with measurable dimensions rather than visual descriptions such as:
small charm
medium charm
large charm
Those descriptions may be useful internally as design language, but they do not identify an exact production component.
Charm Body Size
Depending on the design, useful charm dimensions may include:
- width;
- height;
- thickness;
- profile or depth where relevant.
Not every charm requires the same set of dimensions.
A flat disc charm may need a different measurement focus from a three-dimensional decorative element.
The objective is to record enough information to distinguish the intended component clearly.
| Charm Field | Requirement |
|---|---|
| Charm ID | |
| Width | |
| Height | |
| Thickness, if relevant | |
| Profile, if relevant | |
| Attachment point | |
| Orientation |
Specific values should come from the actual bracelet design rather than from a generic charm size assumption.
Charm Body Size vs Overall Hanging Size
The charm body itself may not represent the full vertical dimension of the assembled charm.
A finished hanging component can include:
- the charm body;
- an attachment loop;
- a connector;
- a jump ring;
- another defined attachment component.
For that reason, it can be useful to distinguish:
Charm Body Height
Overall Hanging Height
The exact measurement method should be documented for the specific design.
For example, if overall hanging height includes the jump ring used to attach the charm to the bracelet, that should be stated. If the ring is excluded, that should also be clear.
The goal is not to create one universal industry measurement rule. It is to prevent different teams from measuring the same charm in different ways.
Attachment Point and Orientation
Charm size alone does not define how the charm should hang.
The product specification may also need to identify:
- attachment point location;
- top orientation;
- front and back where relevant;
- directional face;
- intended hanging direction.
Orientation becomes especially important when the charm contains:
- text;
- logos;
- initials;
- asymmetric shapes;
- one-sided decorative details.
If the component must face a particular direction in the finished bracelet, that requirement should be shown in the design documentation.
How Should Brands Decide Charm Count and Layout Density?
There is no universal number of charms that is correct for every bracelet.
Charm count can depend on:
- bracelet length;
- individual charm dimensions;
- intended visual density;
- charm movement;
- repeated or mixed motifs;
- reserved closure areas;
- extender configuration;
- collection design language.
A bracelet with a few visually prominent charms has a different layout problem from one using several smaller repeated elements.
Brands can use internal layout descriptions to organize design decisions.
Sparse Layout
A sparse layout uses relatively few charms or leaves larger visual gaps between them. This can place more visual emphasis on each individual charm.
Regular or Distributed Layout
A distributed layout places several charms according to a defined spacing or position rule. The charms may be identical or different, but the placement method should remain clear.
Dense Layout
A dense layout places charms closer together or uses a larger number of decorative elements.
With this type of design, charm dimensions, movement and neighboring components may require more attention because the elements occupy more visual and physical space.
These labels can help communicate the intended design direction, but they are not technical specifications by themselves.
A phrase such as “Dense charm layout” should still be supported by actual charm positions or spacing rules.
How Should Charm Spacing Be Measured?
Charm spacing can be measured in more than one way.
The important requirement is not that every bracelet use the same method. It is that the chosen method is clearly defined and applied consistently.
Center-to-Center Spacing
Center-to-center spacing measures from a defined center point of one charm position to the center point of the next.
This can be useful for:
- repeated charm layouts;
- identical charm series;
- controlled sequences;
- symmetrical arrangements.
It can also make it easier to compare positions when charm widths differ.
However, the product specification should still define what counts as the charm's positional center.
Edge-to-Edge Spacing
Edge-to-edge spacing focuses on the visible gap between neighboring charms.
This method can be useful when the visual separation between components matters.
For example, two charms with different widths can have the same center-to-center spacing but very different visible gaps.
If edge-to-edge spacing is used, the specification should make clear which charm edges or reference points are being measured.
Designated Chain Position or Station
Some bracelet constructions can be documented by designated chain positions rather than a free measurement along the full chain.
Possible methods include:
- identified chain links;
- numbered stations;
- designated attachment positions;
- another controlled location system.
This can be useful when charm attachment is tied directly to the chain structure.
The detailed engineering relationship between chain link dimensions and charm attachment belongs in the separate curb-chain bracelet guide. In this article, the important point is simply that the attachment position should be identifiable.
Do Not Mix Spacing Methods Without Explanation
A specification becomes difficult to interpret when one part of the bracelet uses center-to-center spacing while another uses visual edge spacing, but the document does not explain the difference.
If multiple spacing methods are genuinely required, label them clearly.
Otherwise, use one consistent method throughout the layout.
How Should Charm Placement Be Mapped?
Charm placement defines where each component belongs on the bracelet.
The first step is to establish a placement reference point.
Depending on the product, that reference might be:
- the bracelet center;
- a defined chain end;
- a designated chain station;
- a specific component;
- another controlled reference point.
There is no requirement for every bracelet to use the same reference.
What matters is that the reference can be identified consistently.
| Charm ID | Position | Orientation | Spacing Method |
|---|---|---|---|
| CH1 | Center position | Front-facing | Reference |
| CH2 | Left-side position | Defined orientation | ___ |
| CH3 | Right-side position | Defined orientation | ___ |
| CH4 | Additional position | Defined orientation | ___ |
A more detailed layout can also include:
- position measurement;
- chain station;
- attachment hardware reference;
- neighboring charm ID;
- sequence;
- design notes.
This gives designers, sourcing teams and manufacturers one common location reference.
Center Charm vs Repeated Charm Placement
Different charm layouts require different documentation logic.
Center Charm
A design with one dominant center charm should define what “center” actually means.
Possible questions include:
- Is the center based on the main bracelet length?
- Is the extender excluded from the center calculation?
- Is the reference based on a specific chain station?
- Does the charm face a defined direction?
Put the main charm in the center.
This may still be ambiguous if the bracelet includes an extender or asymmetrical end hardware.
The specification should therefore identify the center reference used by the design. For bracelet length and extender definitions, refer to the gold vermeil bracelet sizing guide.
Repeated Charms
A repeated layout might follow a pattern such as:
A – A – A – A
The specification can define:
- charm ID;
- sequence;
- starting position;
- spacing method;
- ending position.
If all repeated charms are identical, one component specification can define the charm itself while the placement map defines where each instance appears.
Alternating Charm Layout
A mixed layout might follow a pattern such as:
A – B – A – B – A
This can be documented using component IDs such as:
- CH-A;
- CH-B.
The placement specification should then establish:
- sequence;
- location;
- spacing;
- orientation;
- any intentional exceptions.
This is more precise than relying only on a reference image.
Symmetrical vs Asymmetrical Charm Layouts
Both symmetrical and asymmetrical charm bracelets can be documented clearly.
The documentation method simply changes with the design.
| Layout Type | Main Documentation Requirement |
|---|---|
| Symmetrical | Define centerline or center reference and mirrored positions |
| Asymmetrical | Define each important charm position individually |
| Repeating | Define sequence and spacing rule |
| Graduated | Define order and size progression |
Symmetrical Layouts
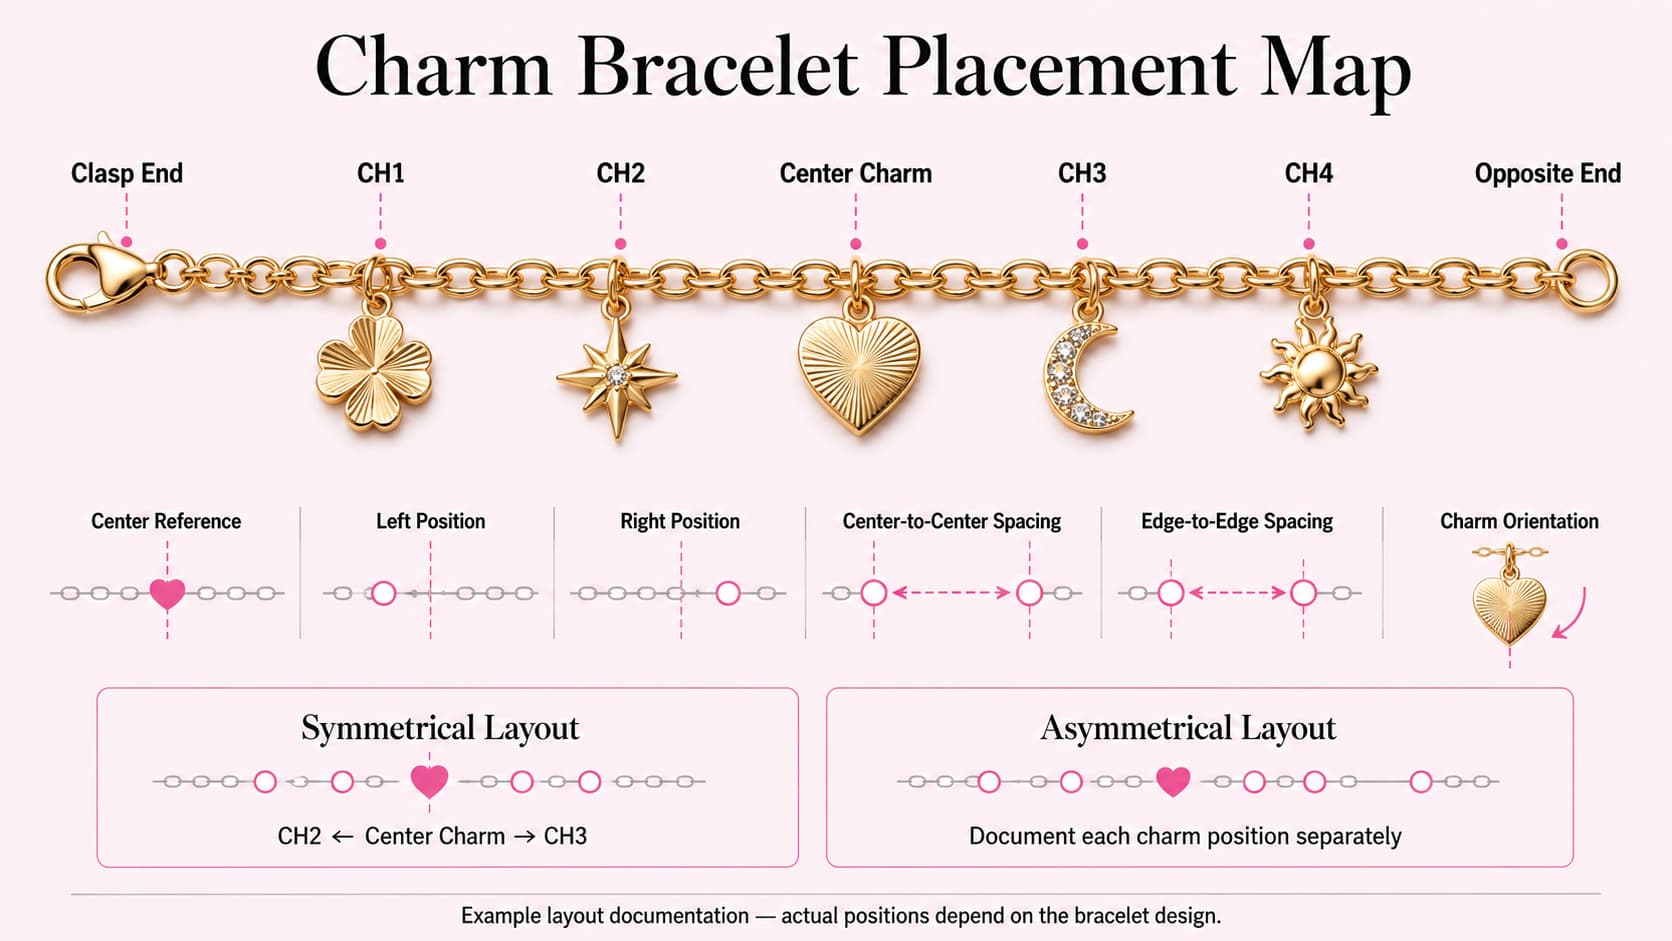
A symmetrical design should define its central reference and how the left and right positions relate to it.
If CH2 and CH3 are intended to mirror each other, the specification should make that relationship clear.
A symmetrical appearance should not depend only on visual interpretation from a rendering.
Asymmetrical Layouts
An asymmetrical bracelet may intentionally use different charm positions on the left and right sides.
In this case, each important position should be documented individually.
Asymmetry should be intentional and measurable rather than the result of undefined placement.
Graduated Layouts
Some designs use charms that change in size across the bracelet.
For example, a larger visual element may be placed in one area while smaller components appear elsewhere.
A graduated layout should define:
- charm sequence;
- charm IDs;
- size progression;
- placement positions.
This prevents the size order from being interpreted differently during production.
How Do Charm Size and Spacing Work Together?
Charm dimensions and spacing should not be treated as unrelated fields.
Two layouts can use the same center-to-center spacing while looking very different if the charm widths are different.
Likewise, a charm with a larger overall hanging size may create a different visual and movement relationship than a smaller component.
Important considerations can include:
- charm width;
- charm height;
- overall hanging size;
- neighboring charm dimensions;
- intended visual separation;
- movement around the bracelet;
- nearby rigid components.
This does not mean larger charms automatically require one specific additional spacing value.
There is no universal formula.
The correct spacing should be defined for the actual design.
Review charm size and charm spacing together before the layout is treated as complete.
How Should Charm Placement Account for the Clasp and Extender?
Charm placement should also consider the bracelet's closure areas.
The clasp, jump rings and extender form part of the bracelet structure even when they are not the visual focus of the charm layout.
Depending on the design, the specification may need to identify:
- reserved closure area;
- first charm position from the clasp side;
- last charm position before the opposite end;
- extender-side placement;
- terminal charm or end component;
- areas where no decorative charm should be placed.
The exact closure hardware should be documented separately in the gold vermeil bracelet clasp and jump ring specifications.
Where does the decorative layout begin and end relative to the bracelet hardware?
That relationship should be shown rather than assumed.
How to Create a Charm Placement Map
A charm placement map turns the visual bracelet concept into a controlled layout.
A simple conceptual sequence might look like:
Clasp End → CH1 → CH2 → Center Charm → CH3 → CH4 → Opposite End
Another design might use a numbered sequence:
Position 1 — CH-A
Position 2 — CH-B
Position 3 — CH-A
Position 4 — CH-C
These are examples of documentation formats, not universal bracelet layouts. The actual placement map should reflect the specific design.
Charm Placement Map Template
| Field | Requirement |
|---|---|
| Style / SKU | |
| Bracelet reference | |
| Layout version | |
| Charm ID | |
| Charm width | |
| Charm height | |
| Charm thickness, if relevant | |
| Overall hanging height, if relevant | |
| Attachment point | |
| Position reference | |
| Spacing method | |
| Spacing requirement | |
| Orientation | |
| Sequence | |
| Closure-side reference | |
| Extender-side reference, if applicable | |
| Additional notes |
A placement map is especially useful when:
- several charms look similar;
- multiple charm sizes are used;
- the design is symmetrical;
- the design is intentionally asymmetrical;
- repeated motifs follow a sequence;
- the bracelet contains a center charm;
- the layout changes between SKUs.
Component IDs
A simple identification system might be:
| Component ID | Function |
|---|---|
| CH1 | Center charm |
| CH2 | Left-side charm |
| CH3 | Right-side charm |
| CH-A | Repeating motif A |
| CH-B | Repeating motif B |
The naming system itself can vary. Consistency matters more than the specific format.
Common Charm Bracelet Design Mistakes
Using “Evenly Spaced” Without a Measurement Method
“Evenly spaced” communicates a design intention, but it does not explain how spacing should be measured.
The specification should define whether spacing is:
- center-to-center;
- edge-to-edge;
- based on chain positions;
- defined another way.
Measuring Only the Charm Body
The charm body may not represent the total hanging dimension.
If the attachment loop or connector changes the overall hanging size, document that relationship where it matters.
Leaving the Center Reference Undefined
A “center charm” is only unambiguous when the bracelet's center reference is defined.
This is especially important when the bracelet includes an extender or asymmetrical end components.
Mixing Center-to-Center and Edge-to-Edge Spacing
Using different spacing methods without labeling them can create inconsistent placement.
If both methods are needed, identify which measurement applies to which positions.
Ignoring Charm Orientation
Directional charms can appear incorrect even when their placement is dimensionally accurate.
Record orientation where the charm contains:
- text;
- logos;
- faces;
- directional motifs;
- asymmetric shapes.
Using Product Photos Instead of a Placement Map
A product image can communicate the intended appearance.
It cannot always define exact position, spacing method or reference points. Use photos as visual references, not substitutes for measurable layout instructions.
Defining Charm Size Without Considering Neighboring Components
A charm can meet its individual dimensional specification while still creating an unintended layout when combined with nearby charms.
Review the assembled design, not only each component independently.
Changing the Layout Without Updating the Documentation
If charm order, spacing, size or position changes, the relevant drawing or layout version should also be updated. Controlled versions help prevent old and new layout instructions from being mixed.
Gold Vermeil Charm Bracelet Design Specification Template
The following template can be used as a practical starting point for a charm bracelet layout specification.
| Specification Field | Requirement |
|---|---|
| Product / Style | |
| SKU | |
| Bracelet layout version | |
| Drawing reference | |
| Bracelet length reference | |
| Placement reference point | |
| Spacing method | |
| Charm count | |
| Charm ID | |
| Charm type | |
| Charm width | |
| Charm height | |
| Charm thickness, if relevant | |
| Overall hanging height, if relevant | |
| Attachment point | |
| Orientation | |
| Position | |
| Neighboring charm reference | |
| Sequence | |
| Center charm identification, if applicable | |
| Symmetry rule, if applicable | |
| Closure-side reserved area | |
| Extender-side placement, if applicable | |
| Additional layout notes |
Not every field will be necessary for every bracelet.
The purpose is to convert the design intention into a specification that can be read consistently across design, sourcing and production teams.
Final Gold Vermeil Charm Bracelet Design Checklist
Before finalizing a custom charm bracelet layout, confirm the following items where applicable:
- ☐ Charm IDs defined
- ☐ Charm body width defined
- ☐ Charm body height defined
- ☐ Charm thickness defined where relevant
- ☐ Overall hanging size defined where relevant
- ☐ Attachment point defined
- ☐ Charm orientation defined
- ☐ Placement reference point defined
- ☐ Spacing method defined
- ☐ Charm count documented
- ☐ Center charm position defined where applicable
- ☐ Repeated charm sequence defined
- ☐ Alternating charm sequence defined where applicable
- ☐ Symmetrical positions defined
- ☐ Asymmetrical positions individually documented
- ☐ Graduated charm order defined where applicable
- ☐ Closure-side placement documented
- ☐ Extender-side placement documented where applicable
- ☐ Charm size reviewed together with spacing
- ☐ Layout drawing or placement map referenced
- ☐ Drawing or specification version identified
A good charm bracelet specification does not need to turn the design into unnecessary complexity. It needs to make the intended charm size, spacing, orientation and placement clear enough that the layout does not depend on guesswork.
Frequently Asked Questions
How should charm size be measured for a bracelet?
Define the dimensions that are relevant to the specific charm, such as width, height and thickness where applicable. The specification should also state the measurement method clearly enough to distinguish the intended charm from alternatives.
Should charm dimensions include the jump ring or attachment loop?
It depends on the measurement being documented. Charm body dimensions and overall hanging dimensions can be recorded separately when the attachment loop, connector or jump ring changes the assembled size. The specification should make clear what each measurement includes.
Should charm spacing be measured center-to-center or edge-to-edge?
Either method can be used when appropriate. Center-to-center spacing can be useful for repeated or controlled positions, while edge-to-edge spacing can describe the visible gap between charms. The selected method should be clearly defined and applied consistently.
How do I position a center charm on a bracelet?
First define what the bracelet's center reference means for that product. The center may be based on the main bracelet length, a designated chain position or another controlled reference. Then document the charm's location and orientation relative to that reference.
Does a symmetrical charm bracelet need a placement map?
A placement map can be useful even for a symmetrical bracelet because it defines the center reference, mirrored positions, charm IDs and spacing method. It reduces reliance on visual interpretation alone.
Do larger charms need more space between them?
They may require a different spacing decision because charm width, overall hanging size, movement and neighboring components can change the layout. However, there is no universal spacing formula. The required spacing should be defined for the specific bracelet design.
How should charm placement be documented for custom production?
Use a controlled layout or placement map that identifies charm IDs, dimensions, attachment points, orientation, position references, spacing method and sequence. Where relevant, also document the relationship to the clasp, extender and bracelet ends.
Define Your Custom Gold Vermeil Charm Bracelet Layout
Charm size, spacing and placement should work together as one controlled design system.
Brands developing custom pieces can review Zhefan Jewelry's gold vermeil bracelets and use the gold vermeil bracelet specification guide to organize the broader product requirements.
For bracelet length, fit and extender definitions, refer to the gold vermeil bracelet sizing guide. For clasp, jump ring and closure hardware documentation, use the gold vermeil bracelet clasp and jump ring specification guide.
If your team has already defined the charm dimensions, layout sequence, spacing method and placement concept, share your requirements with Zhefan Jewelry to discuss the custom production requirements for your project.
Share Your Charm Bracelet Design Requirements
Recommended for you

What Is Gold Vermeil Jewelry? A Complete Guide for Brands and Retailers
Thick Gold Plated Jewelry Manufacturer for 925 Silver & Brass Jewelry

How to Choose a Gold Vermeil Jewelry Manufacturer

Gold Vermeil vs. Gold-Plated Jewelry: Which Fits Your Luxury Jewelry Brand?

Can Silver or Brass Be PVD Coated? A Professional Guide for Jewelry Brands

How to Make Bulk Jewelry Match the Approved Sample: A Production Control System for Jewelry Brands
Product Categories
Discuss Your Ideas with a Professional Custom Jewelry Manufacturer
We provide personalized jewelry customization services for clients worldwide.
Rest assured that your privacy is important to us, and all information provided will be handled with the utmost confidentiality.
By clicking 'Send Inquiry Now' I agree to ZHEFAN JEWELRY processing my personal data.
To see how to withdraw your consent, how to control your personal data and how we process it, please see our Privacy Policy and Terms of use.
From design to production, ZHEFAN JEWELRY offers a one-stop solution to help you enhance your brand value and market competitiveness.
Get A Quote
Contact
Tel: (+86) 188 1927 7817
© 2026 Zhefan Jewelry. All Rights Reserved.
Facebook
Instagram
YouTube
Whatsapp: +8618819277817